This guide explains how to adjust the parking brake lining clearance and lever travel on Isuzu vehicles.
ISUZU TRUCK DIAGNOSTIC KIT (MX2) with ISUZU IDSS 2019V G-IDSS and E-IDSS Software
Adjusting the Parking Brake Lining Clearance
- Jack Up the Vehicle:
- Raise the rear axle until the wheels can turn freely.
- Raise the rear axle until the wheels can turn freely.
- Remove Check Hole Cover:
- Remove one of the two check hole covers from the parking brake drum.
- Align Check Hole:
- Rotate the brake drum to align the check hole with the adjusting screw.
- Center the Brake Shoes:
- Move the camshaft lever from side to side several times to center the brake shoes.
- Adjust the Brake Shoes:
- Insert a screwdriver into the check hole.
- Rotate the adjusting screw by pushing it upward until the brake shoes begin to drag on the drum.
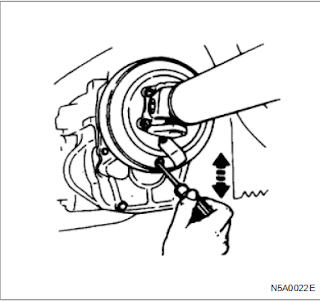
- Back Off the Adjusting Screw:
- Back off the adjusting screw the specified number of notches to achieve the correct clearance.
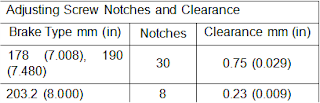
- Back off the adjusting screw the specified number of notches to achieve the correct clearance.
- Reinstall Check Hole Cover:
- Reinstall the check hole cover.
- Lower the Vehicle:
- Lower the rear wheels to the floor.
Adjusting the Parking Brake Lever Travel
- Set and Release the Parking Brake Lever:
- Fully set and release the parking brake lever several times.
- Leave the parking brake lever in the released position.
- Loosen the Control Wire Lock Nut:
- Loosen the parking brake control wire lock nut (1).
- Adjust Lever Travel:
- Turn the adjuster (2) to adjust the lever travel to the specified notches.
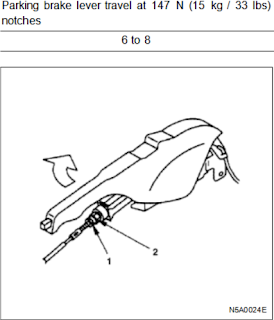
- Turn the adjuster (2) to adjust the lever travel to the specified notches.
- Retighten the Lock Nut:
- Retighten the control wire lock nut (1).
- Check Lever Travel:
- Check the parking brake lever travel, measured in notches, to ensure proper adjustment.
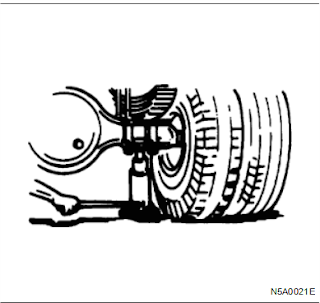
Reference Diagram
- Legend:
- Screwdriver
- Adjusting screw
- Brake drum
- Brake shoe
- Clearance
- Direction of brake shoe expansion (for 178 mm, 190 mm)
- Reinstall check hole cover