Update MaxiSys Firmware
The internal programming of the MaxiSys Diagnostic System, known as the firmware, can be updated using the Update application. Firmware updates increase the MaxiSys applications’ capabilities, typically by adding new tests, new models, or enhanced applications to the database.
The display device automatically searches for available updates for all of the Maxisys components when it is connected to the internet. Any Updates that are found can be downloaded and installed on the Autel Pro scanner.
This section describes installing an update to the Autel Maxisys Pro Diagnostic System firmware. A notification message displays if an update is available when the Notifications function is enabled in the Settings applications.
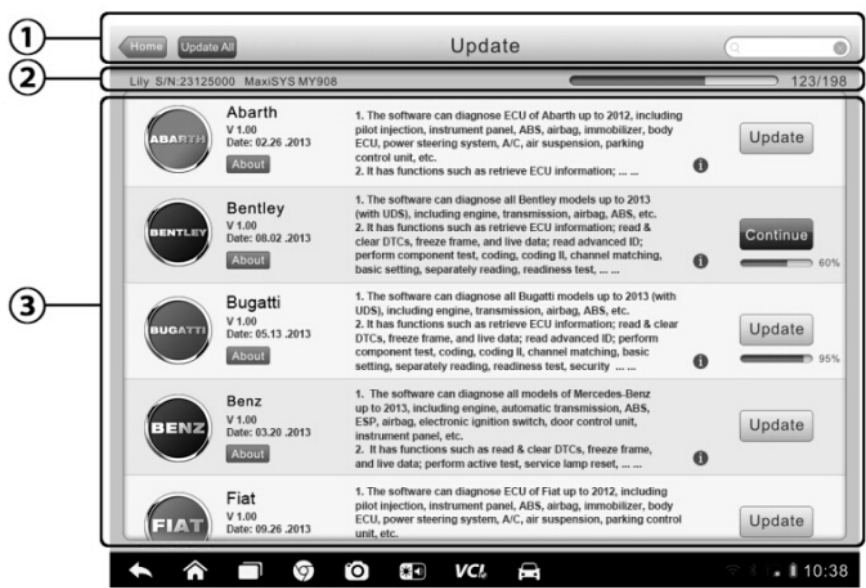
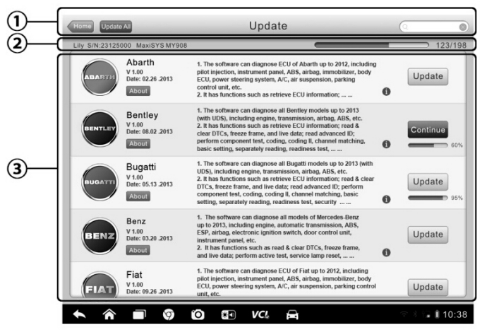
Example update screen:
1.Navigation and Controls
Ome Button-returns to the MaxiSys Job Menu
Update All-updates all available updates
Search Bar-search specific update item by inputting the file name, for example, a vehicle make
2.Status Bar
Left Side-displays the MaxiSys device model information and serial number
Right Side-displays an update progress bar indicating the completion status
3.Main Section
Left Column-displays vehicle logos and update firmware version information; tab the About button displays a function list in PDF showing more details about the firmware.
Middle Column-displays a brief introduction about the new changes to the firmware operation or capabilities. Tap
Button to open an information screen to view more details, and tap the dim area around to close the window.
Right Column-according to the operation status of each firmware item, the button displays differently.
1.Tap Update to update the selected item
2.Tap Pause to suspend the updating procedure.
3.Tap Continue to go on updating the suspended update
To update the firmware:
1 Power up the MaxiSys pro tablet, and ensure that it is connected to a power source and with steady internet connection
2 Tap the Update application button from the MaxiSys Job Menu; or tap the update notification message when received one. The Update application screen displays.
3 Check all available updates:
If you decide to update all the items, tap the Update All button
If you want to update some individual items, tap the Update button on the right column of the specific item.
4 Tap the Pause button to suspend the updating process. When you tape Continue to renew the update, the updating process will resume from the break point.
5 When the updating process is completed, the firmware will be installed automatically. The new version will replace the original version if thee is one.
VCI Manager Operations
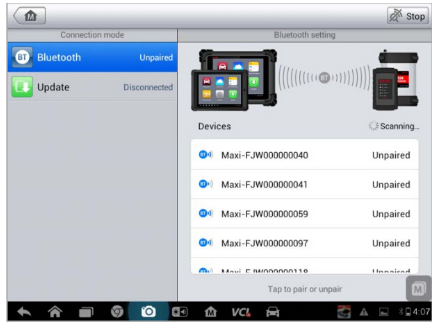
This application allows you to pair up the MaxiSys Display Tablet with the VCI device-the Wireless Diagnostic Interface, and to check the communication status.
1 Connection Mode
There are two connection modes available for selction. The connection state is displayed alongside.
BT Paring-when paired to a wireless device, the connection state displays as Paired; otherwise it displays as Unpaired.
Update(for VCI software only)-Update VCI software via internet through the MaxiSys tablet networking using USB connection.
2 BT Setting
The BT Setting screen displays the type and a partial serial number for all of the device available for pairing. Tap a required device to start paring. The BT status icon displayed to the left of the device name indicates the received signal strength.
3 BT Pairing
The VCI module needs to be either connected to a vehicle or to an available power source, so that it is powered up during the synchronization procedure.
Make sure the MaxiSys Display Tablet has a charged battery or is connected to an AC/DC power supply.
To pair the VCI module with the MaxiSys system
1.Power on the MaxiSys display Tablet
2.Connect the 26-pin end of the data cable to the J2534 ECU Programming Device’s vehicle data connector
3.Connect the 16-pin end of the data cable to the vehicle data link connector (DLC)
4.Tap the VCI Manager application on the MaxiSys Job Menu of the tablet
5.Select BT from the connection mode list
6.Tap the Scan button at the top right corner. Now the device starts searching for available pairing units.
7.Depending on the VCI type you use, the device name may display as Maxi suffixed with a serial number. Select the required device for pairing.
8.When pairing is successfully done, the connection status displayed to the right of the device name is shown as Paired.
9.Wait a few seconds, and the VCI button on the system Navigation bar at the bottom of the screen shall display a green tick icon, indicating the display tablet is connected to the VCI device.
10.Tap the paired device again to unpair it.
11.Tap the Back button on the top left to return to the MaxiSys Job Menu.
NOTE:
A VCI module can be paired to only one Display Tablet each time, and once it’s been paired, the device will not be discoverable for any other unit.
Any other problem please contact us via Email: service@autonumen.com

