This instruction show you guide on how to remove and install exhaust manifold for Perkins 400A and 400D industrial engines.
See More: Perkins EST 2022A Electronic Service Tool
Procedures:
Removal Procedure
Start By:
a.If the engine is equipped with a turbocharger,remove the turbocharger. Refer to Disassembly and Assembly, “Turbocharger,Remove and Install”.
NOTICE
Keep all parts clean from contaminants.
Contaminants may cause rapid wear and shortened component life.
Note: The two cylinder, the three cylinder and the four cylinder engines have different exhaust
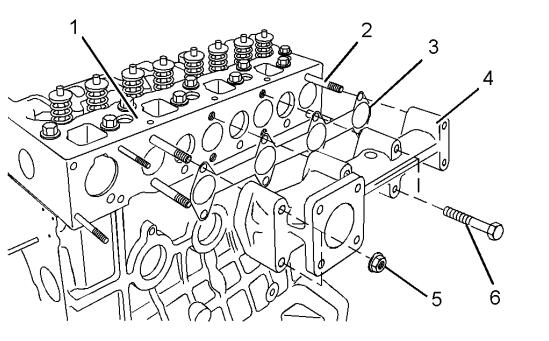
manifolds. The removal procedure is similar for all models.Illustration 25 g01326567
1.Loosen nuts (5) and bolts (6).
Note: To prevent distortion of the exhaust manifold,loosen the outer fasteners first.
2.Remove nuts (5) and bolts (6).
Note: Identify bolts of different lengths so that the bolts can be installed in the correct positions.
3.Remove exhaust manifold (4) from cylinder head
(1 Note the orientation of the exhaust manifold for installation.
4.Remove gasket (3) from cylinder head (1).
5.If necessary, remove exhaust manifold studs (2) from cylinder head (1).
Installation Procedure
NOTICE
Keep all parts clean from contaminants.
Contaminants may cause rapid wear and shortened component life.
Note: The two cylinder, the three cylinder and the four cylinder engines have different exhaust manifolds. The installation procedure is similar for all models.
1.Ensure that the mating surfaces of the cylinder head and the exhaust manifold are clean and free from damage.
2.If necessary, install exhaust manifold studs (2) to cylinder head (1).
3.Install a new exhaust manifold gasket (3) to cylinder head (1).
4.Align exhaust manifold (4) with studs (2) and install the exhaust manifold to cylinder head (1).
Note: Ensure that the exhaust manifold is installed in the correct orientation.
5.Install nuts (5) and bolts (6) finger tight.
Note: Ensure that bolts of different lengths are installed in the correct positions.
6.For 402D-05, 403D-07, 403A-11, 403D-11, 403A-15, 403D-15, 403D-15T, 403D-17, and 404D-15 engines, tighten nuts (5) and bolts (6) to a torque of 10 N·m (89 lb in).
For 404A-22, 404D-22, 404D-22T, and 404D-22TA engines, tighten nuts (5) and bolts (6) to a torque of 25 N·m (18 lb ft).
Note: On three cylinder engines and four cylinder engines, tighten the inner bolts first.
End By:
a.If the engine is equipped with a turbocharger,install the turbocharger. Refer to Disassembly and Assembly, “Turbocharger, Remove and Install”.
More Perkins case,please refer to:Perkins Engine Trouble Repair